Inline Foil

With Inline Foil, you can turn full-color printing into full-color foil.
Inline Foil uses a special processed foil system that is applied under a full-color process to create an array of foil colors. It's simple, affordable, and makes your prints stand out from the crowd.
State-of-the-art equipment allows us to produce large solid areas as well as reverse out areas of foil. You can produce foiled halftones, gradients, and have multiple colors in foil on the same design. The design possibilities are limited only by your imagination.
- Available in a wide variety of sizes from 1.5” x 3.5” to 8.5” x 11”
- Double-sided varnish, spot varnish, or no coating is available
- Single or double-sided printing
- Super-fast turnaround
Products:
- Business Cards
- Postcards
- Sell Sheets
- Trading Cards
- Hang Tags
- Stickers
- Announcement Cards
- Greeting Cards
- Presentation Folders
How to Set Up Your Files for Inline (Akufoil) Foil
For an Inline Foil job, you must include a mask file along with your CMYK file. The mask file indicates where the Inline Foil will be applied. The file setup is the same as Spot UV. Use 100% K where the Inline Foil needs to be applied and white where the Inline Foil is not applied.
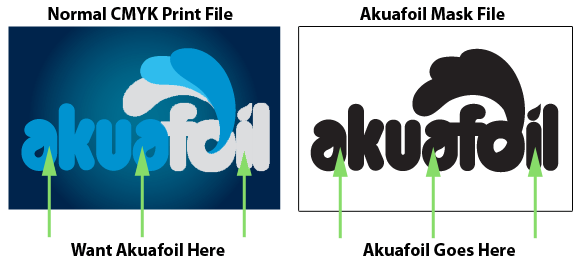
As shown above, the file on the left is the normal CMYK print file. If you want the logo to be an Inline Foil, then your mask file should look like the file on the right. The white indicates no foil, and black 100% K indicates where the Inline Foil will be applied.
Here are some more things to keep in mind when creating your Akuafoil artwork:
- When uploading, remember to upload each file (CYMK and mask) separately. Make sure the mask and CMYK print file are aligned. They should match exactly in size and position.
- Akuafoil works best on lighter colors. The darker the CMYK color, the less vibrant the foil effect.
- Do not use very thin or small text and artwork. Use San Serif fonts above 12 point for best results.
- For better quality, we recommend creating mask files in vector-based programs such as Illustrator or CorelDRAW.
- It’s recommended to exaggerate the contrast between tints because the foil will make your color shifts more subtle. For instance, if you have stripes and one stripe is 70% and the other is 40%, you may want to decrease the 40% stripe to 30% OR increase the 70% stripe to 80% to create more contrast.
- The Raised Spot UV is a glossy accent with minimal height.
Instructions for Creating Silver Foil Color
If you would like a silver Inline Foil printed, make sure to have at least 15% black in the CMYK print file area to achieve the highest-quality silver Akuafoil effect.

How to Create Knockouts/Reversed Type for Inline Foil
When creating knockouts in the Akuafoil mask or in the CMYK print file, please be aware that there might be a "Halo" of white around the knockout area.
To prevent this, grow/stroke the Akuafoil area in the mask by 1 point. This will allow the Akuafoil to bleed into the CMYK area, reducing the white "Halo" effect. You can also fill in the knockout with a color to reduce the effect further.
If you need help, you can hire one of our graphic designers. Our rates are very reasonable.
Design Templates
Design your inline foil right the first time by using a template. Our templates are setup accurately assuring your print job is produced properly. To download, click the download template button below:
Download Template
Ordering & Artwork Setup Guide
Step 1. Choose Product
- If you can not find the product you are looking for submit a custom quote here
Step 2. Select Product Options
- Size
- Color
- Turnaround Time
- Coating
- Etc.
Step 3. Add Product to Shopping Cart
- You will see an instant price for all listed products
- Click the Add To Cart Button
Step 4. Review Shopping Cart
- Name Your Job
- Select Shipping Method
- Add Any Special Instructions
- Once Satisfied Click The Checkout Button or Continue Shopping
Step 5. Payment Page
- Select Billing Address
- Select Payment Method
- Review and Accept Terms/Conditions
- Click Complete Button
Step 6. Upload Files
- Upload Now
- Upload Later
- My Designer Will Upload
- Files Are At A 3rd Party Download Source (i.e. ftp, dropbox, sendspace)